
Removing a dock plate hold-down assembly requires careful attention to safety and procedure. This guide details disconnecting components, ensuring a hassle-free and efficient process for maintenance or repair.
Understanding the Function of a Hold-Down Assembly
The dock leveler hold-down assembly is a crucial safety component in mechanical dock levelers. Its primary function is to securely lock the dock leveler deck in place when not actively in use, preventing accidental movement and potential hazards. This mechanism utilizes a ratchet bar and body system to maintain a firm hold.
Without a functioning hold-down, the dock plate could unintentionally lower or shift, creating a dangerous gap between the dock and the trailer. This could lead to falls, equipment damage, or injuries to personnel. Understanding this vital role emphasizes the importance of proper maintenance and timely repair of the hold-down assembly. Regular inspection and prompt attention to any issues are essential for workplace safety.
Safety Precautions Before Removal
Prioritizing safety is paramount when removing a dock plate hold-down assembly. Always confirm a safety stand is firmly in place before beginning work; this prevents unexpected deck lowering during disassembly. Utilize appropriate personal protective equipment (PPE), including safety glasses and gloves.
If cutting torches are required, a dedicated fire watch must be present to mitigate fire hazards. Ensure the area is well-ventilated and free of flammable materials. Disconnect all power sources to the dock leveler to avoid electrical shock. Thoroughly assess the assembly’s condition before starting, and be aware of potential spring tension or stored energy within the components.

Tools Required for Removal
Successful removal demands essential hand tools and potentially specialized equipment like cutting torches. Proper tools ensure efficient disassembly and minimize risks during the process.
Essential Hand Tools
A comprehensive set of hand tools is crucial for safely and effectively removing a dock plate hold-down assembly. This includes a variety of wrenches – both open-end and box-end – to accommodate different fastener sizes found within the assembly. Sockets, along with a ratchet and extensions, will provide leverage and access to hard-to-reach bolts and nuts.
Screwdrivers, both Phillips head and flathead, are essential for removing any screws securing components. Pliers, including locking pliers, can assist in gripping and manipulating parts. A hammer may be needed for gently dislodging stubborn pieces, but should be used with caution to avoid damage. Don’t forget a punch set for driving out pins or loosening tight connections. Finally, a good quality penetrating oil will be invaluable for loosening corroded or seized fasteners, simplifying the disassembly process.
Specialized Tools (Cutting Torches, etc.)
While most removals rely on hand tools, certain situations necessitate specialized equipment. Cutting torches, specifically oxy-acetylene or plasma cutters, may be required if fasteners are severely corroded or damaged, rendering them impossible to remove conventionally. However, extreme caution is paramount when using cutting torches; a dedicated fire watch and adherence to all safety protocols are absolutely essential to prevent fires or injuries.

Heavy-duty grinders with cutting wheels can also be employed for similar purposes, offering a potentially safer alternative to open flames. Additionally, a hydraulic jack or support stands are vital for safely securing the dock leveler during the removal process, preventing unexpected drops. Always prioritize safety and ensure proper training before operating any specialized tool.

Step-by-Step Removal Process
Begin by securing the dock leveler and carefully removing existing hold-down components. Disengage the dock plate, then separate assemblies, following a methodical sequence for safety.
Securing the Dock Leveler
Prior to initiating any disassembly of the dock plate hold-down assembly, absolute stabilization of the dock leveler is paramount. This crucial first step prevents unexpected lowering of the deck during the removal process, mitigating potential hazards to personnel and damage to equipment.
Employ a robust safety stand, specifically designed for dock leveler maintenance, and ensure it is firmly and correctly positioned beneath the dock plate. Confirm the stand’s weight capacity exceeds the leveler’s weight. Double-check its stability before proceeding.
Additionally, consider utilizing wheel chocks to further immobilize the truck or trailer docked at the bay, adding an extra layer of security. A thorough visual inspection of the entire setup is recommended to verify a secure and stable working environment.
Removing Existing Hold-Down Components
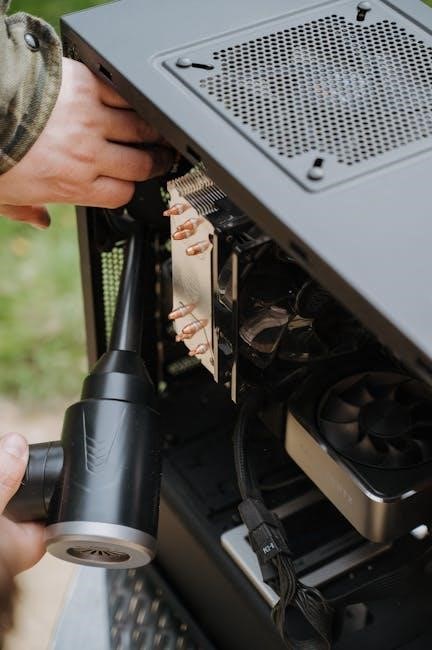
With the dock leveler securely supported, begin dismantling the existing hold-down assembly. Utilizing appropriate hand tools and, if necessary, cutting torches – always with a designated fire watch present – carefully remove all components related to the hold-down mechanism.
This includes the ratchet bar, the hold-down body, and the pinion, shaft, and guide assembly. Discard these components responsibly after removal. Pay close attention to any fasteners, springs, or retaining clips, documenting their location for reassembly if applicable.
Ensure a systematic approach to avoid overlooking any parts. A clean workspace will aid in organization and prevent lost components during this stage of the removal process.
Disengaging the Dock Plate

Before proceeding, fully disengage the dock plate from its secured position. Operate the dock leveler’s controls to raise the plate to its highest operational level. This action creates necessary clearance for subsequent disassembly steps.
Once elevated, locate and pull the release chain – this is a critical step in fully disconnecting the plate. Confirm the plate is free-floating and no longer mechanically linked to the hold-down assembly.
Exercise caution during this process, maintaining a firm grip and awareness of the plate’s movement. A second person can assist in monitoring and ensuring a safe disengagement.
Separating the Pinion, Shaft, and Guide Assembly
Carefully separate the pinion, shaft, and guide assembly from the release gear assembly. This component grouping is integral to the hold-down mechanism’s functionality, requiring methodical disconnection.
Begin by inspecting the connection points for any retaining hardware – bolts, pins, or clips. Remove these fasteners systematically, noting their location for reassembly. Gently maneuver the pinion, shaft, and guide assembly away from the release gear.
Avoid forceful separation, as this could damage delicate components. If resistance is encountered, re-examine for hidden fasteners or obstructions. Proper separation is crucial for a successful hold-down assembly removal.
Removing the End Plate
The end plate secures the hold-down assembly and must be removed to continue the disassembly process. Before proceeding, ensure the dock leveler remains safely supported by a stand to prevent unexpected movement.
Locate the fasteners securing the end plate – typically bolts or screws. Using the appropriate tools, carefully remove these fasteners, storing them safely for reinstallation. Once all fasteners are removed, gently pry the end plate away from the assembly.
Be mindful of any internal components that may be connected to the end plate. A controlled removal prevents damage and ensures a smooth reassembly process later on.
Disconnecting the Ratchet Bar
The ratchet bar is a key component of the hold-down assembly, responsible for securing the dock plate in place. Disconnecting it requires careful attention to avoid damage or injury.
Typically, the ratchet bar is connected via a pin or similar fastener. Locate this connection point and, using the appropriate tools, carefully remove the securing pin. Once the pin is removed, the ratchet bar should slide or lift free from the hold-down body.
Inspect the ratchet bar for any signs of wear or damage during removal. Note its orientation for correct reinstallation, ensuring smooth operation of the hold-down mechanism.
Detaching the Hold-Down Body
With the ratchet bar disconnected and other components removed, detaching the hold-down body is the next crucial step. This component houses the internal mechanisms responsible for engaging and disengaging the dock plate.
The hold-down body is usually secured to the dock leveler frame with bolts or a similar fastening system. Locate these fasteners and, using the appropriate wrenches or sockets, carefully loosen and remove them. Support the hold-down body as you remove the final fasteners to prevent it from dropping.
Once free, carefully lift the hold-down body away from the dock leveler, inspecting it for any signs of damage or wear during removal.

Component Identification
Key components include the ratchet bar, hold-down body, pinion/shaft/guide assembly, and release gear assembly. Understanding these parts aids in proper disassembly and reassembly.
The Ratchet Bar
The ratchet bar is a crucial element within the dock plate hold-down assembly, responsible for securing the dock leveler in its retracted, or ‘at rest’, position. It functions as a locking mechanism, preventing unintentional movement and ensuring workplace safety. This component works in conjunction with the hold-down body to maintain a firm grip.
During removal, the ratchet bar must be carefully disconnected. It’s often the last component detached from the hold-down body. Inspecting the ratchet bar for wear and tear is vital during post-removal assessment; damaged teeth or a compromised locking mechanism necessitate replacement. Proper functionality of the ratchet bar is paramount for reliable dock leveler operation and preventing accidental lowering.
The Hold-Down Body
The hold-down body serves as the primary housing and structural support for the entire assembly. It’s the component directly interacting with the dock leveler’s frame, providing a secure mounting point for the ratchet bar, pinion shaft, and release gear. Often constructed from heavy-duty steel, it’s designed to withstand significant forces and repeated use.
When removing the assembly, detaching the hold-down body is a key step, typically following the disconnection of the ratchet bar. Thoroughly inspect the body for cracks, corrosion, or deformation. Any structural compromise renders it unsafe and requires immediate replacement. Ensuring the body is free from obstructions before removal is crucial for a smooth process.
Pinion, Shaft, and Guide Assembly
This assembly is critical for translating rotational motion into linear movement, securing the dock plate in both extended and retracted positions. The pinion gear meshes with the ratchet bar, while the shaft transmits power from the release gear. The guide ensures smooth and controlled movement, preventing binding or misalignment.
Removal involves separating this unit from the release gear assembly, often requiring careful maneuvering and potentially specialized tools. Inspect the pinion for worn teeth, the shaft for bends, and the guide for damage. Proper lubrication is essential for optimal function; address any dryness or contamination during inspection.
Release Gear Assembly
The release gear assembly is the core mechanism for disengaging the hold-down, allowing the dock plate to be raised or lowered. It typically consists of a lever, gears, and a connecting rod that interacts with the pinion shaft. Understanding its operation is vital for safe removal and reinstallation of the hold-down components.
Before disassembly, note the orientation of all parts. Carefully detach the assembly from the hold-down body, paying attention to any springs or detents. Inspect the gears for wear or damage, and check the lever for smooth operation. Lubricate moving parts to ensure continued functionality after reassembly.

Post-Removal Inspection
Thoroughly inspect all removed components for damage and wear. Look for cracks, corrosion, or deformation that may compromise functionality and require replacement or repair.
Checking for Damage
A meticulous damage assessment is crucial post-removal. Begin with the hold-down body, carefully examining it for any cracks, fractures, or signs of metal fatigue. Inspect weld points for integrity, as these are common failure areas. Next, scrutinize the ratchet bar, looking for bent teeth, wear, or deformation that could hinder its locking mechanism.
The pinion, shaft, and guide assembly should be checked for smooth operation and any visible damage to the gears or bearings. Ensure the shaft isn’t bent or scored. Finally, inspect the release gear assembly for broken or worn components. Any damaged parts must be replaced to guarantee the dock leveler’s safe and reliable operation. Document all findings for repair records.
Assessing Component Wear
Evaluating wear is vital alongside damage inspection. Examine the ratchet bar’s teeth for rounding or significant wear, indicating reduced grip and potential slippage. Check the hold-down body for excessive wear on contact points, which can affect its secure locking function. The pinion gear should be inspected for worn teeth, impacting smooth engagement and disengagement.
Assess the shaft and guide assembly for play or looseness, suggesting bearing wear or damage. Look for corrosion or pitting on any components, which accelerates deterioration. Consider the overall operational history; frequent use necessitates more frequent wear assessment. Replacing worn components proactively prevents failures and maintains safety standards.

Testing Procedures After Repair
Post-repair, verify smooth operation and proper hold-down function. Ensure the dock leveler securely locks in both the loaded and unloaded positions for safety.
Ensuring Smooth Operation
After reassembly, meticulous testing is crucial. Begin by slowly cycling the dock leveler through its full range of motion, observing for any binding or resistance. Pay close attention to the engagement and disengagement of the hold-down mechanism. Listen for unusual noises that might indicate misalignment or improperly adjusted components.
Manually operate the release mechanism several times to confirm it functions freely and reliably. Check that the ratchet bar moves smoothly within the hold-down body. Verify the pinion, shaft, and guide assembly operate in unison without friction. A properly functioning system should exhibit consistent, effortless movement throughout each cycle, guaranteeing safe and efficient loading dock operations. Any hesitation warrants immediate re-inspection.
Verifying Proper Hold-Down Function
Confirming secure hold-down is paramount for dock safety. With the dock plate in the fully raised position, engage the hold-down mechanism. Attempt to manually move the plate; it should remain firmly locked in place, resisting any applied force. Inspect the engagement points to ensure complete contact and secure locking.
Repeat this test multiple times, varying the load distribution on the dock plate to simulate real-world conditions. A reliable hold-down prevents accidental lowering during loading or unloading. If any slippage or movement is detected, immediately re-examine the assembly for proper adjustment or component wear; A robust hold-down is essential for preventing injuries and damage.

Professional Repair Services
Complex repairs or uncertainties necessitate expert assistance. Qualified technicians ensure correct diagnosis, component replacement, and thorough testing for optimal dock leveler functionality and safety.
When to Seek Expert Assistance
Determining when professional help is needed is crucial for safety and efficiency. If you encounter significant resistance during removal, or suspect damage beyond simple component wear, immediately consult a qualified technician. Attempting complex repairs without the proper knowledge and tools can lead to further damage or, more importantly, create a hazardous working environment;
Specifically, if you are uncomfortable using cutting torches, or are unsure about disengaging the dock plate and separating the pinion assembly, professional intervention is highly recommended. Furthermore, any issues with the release gear assembly or the ratchet bar mechanism should be addressed by an experienced professional. Don’t hesitate to prioritize safety and seek expert assistance when needed – it’s a wise investment in the longevity and reliable operation of your dock leveler.
Finding a Qualified Technician
Locating a skilled technician specializing in dock leveler repair is essential. Begin by seeking recommendations from fellow businesses or industry contacts. Online directories and professional associations, such as those focused on material handling equipment, can also provide valuable leads.
When vetting potential technicians, verify their certifications and experience specifically with dock plate hold-down assemblies. Inquire about their familiarity with your specific dock leveler model. A reputable technician will offer transparent pricing, detailed explanations of the repair process, and a commitment to safety. Prioritize companies that provide documented proof of insurance and adhere to industry best practices. Houston-based services are available, but ensure expertise regardless of location.